How to Make Blending Tools for Pencil Drawing
You guys asked for it, so here IT is: the most requested tutorial to particular date: How to Spook + Shading Techniques! :)
Shading is the process of applying varying levels of dark to create the illusion of form and depth.
Away from practicing proper shading and blending techniques, a good agreement of light, planes and contours are crucial for turn a savorless line drawing into a realistic portraiture that conveys the delusion of form, bringing your drawing to life.
Below is a equipment failure of what you can expect to learn from this shading teacher.
You privy click on the golf links below to speedily jump to any part of the teacher. However, I highly suggest you read all the mode through with!
Part 1: Understanding Pencil Grades
⦁ Introduction to Black lead Pencils
⦁ Shading with One Pencil
⦁ Blending with a Variety of Pencils
⦁ Black-and-white
Part 2: Pencil Blending Techniques
⦁ Hatching
⦁ Cross Crosshatch
⦁ Circulism
⦁ Contour line Shading
Part 3:Pencil Shading Tips & Tricks
⦁ How to Shade Smoothly
⦁ Increment your Range of Motion
⦁ Use the Right Amount of Pressure
⦁ Value Body
Part 4: Understanding Lite
⦁ The Light and Dark Side
⦁ Cast Shadow and Occlusion Shade off
Part 5: Intro to Planes
Part 6:Representing Form
⦁ Abrupt vs Gradual Shading Transitions
⦁ Is Your Drawing Too Flat?
⦁ Bumps and Ridges
Component 7: Shading Use
⦁ Shading Exercises and Printable Worksheets
Specific shading tutorials:
- How to Spectre a Face
- How to Fill in an Eyeball
- …will add more soon!
Understanding Pencil Grades
To achieve a realistic drawing that communicates spring and depth, your drawing will demand to have a wide rank of values. Seat in a set of mellow calibre pencils with a order of grades that fit your specific drawing needs.
A exemplary full set of pencils will range from 9H (hardest) to 9B (softest). Having a full set is non necessary for portrayal draft. The run you need depends on the typewrite of drawings you do.
What are the high-grade pencils for sketching and shading?
Stony pencils produce clean, sharp and light lines which are great for sketching, field drawings, merchandise sketches, etc. The harder the pencil, the more challenging it is to blend or smutch.
Glucinium careful when shading or outlining with unpleasant, touchy pencils because they can leave deep indents in your paper which are very difficult to cover up.
Soft pencils produce dull and dark lines which are easy to blend. Small pencils deposit more black lead with less effort, making it easy to fill in space, flux, shade and add texture to your drawing. They are the best pencils for shading and drawing portraits!
The pencil grades I use the most for portrayal drawing are: HB, 4B, 6B and 8B from Derwent. You can click present to check it out connected Amazon.
The superior shading pencils should be free of impurities.

You can tell how hard or compressible a pencil is by looking the combination of letters and numbers printed connected the end of each pencil.
H: Hard
F: Fine Point
HB: Hard Dirty
B: Inglorious
Black and White
Coloured: With graphite pencils, you won't get a cryptic black. However, you can reach it with charcoal. They are really very commonly used together with impressive results.
White-hot: You may have seen artists use punitory fluid (whiteout), paint or hot pencil crayon to bring out unattackable highlights in their drafting. This gives the drawing a very impactful look and can enhance the level naive realism. Here's an example.
Shading with One Pencil

If your tool bash presently consists of a single HB pencil, your portraits are probably lacking depth.
The Haemoglobin pencil (aka #2 pencil) is absolutely great for drawing off preliminary outlines and shading light areas because information technology doesn't require much effort to farm cowardly lines. However, you'll need to lend oneself very much of pressure when it comes to blending dark shadows. All this effort can damage your paper, resulting in a lottery that doesn't transform well from multiple wake angles. Non to mention, it will be out to erase.
Here's an enlarged example on slight sketch paper.

If you choose to use only one pencil, I suggest victimisation a 2B, 3B operating theatre 4B. They're flexible enough to reach some ends of the prize scale without much effort. If your drawings are usually light, try for a 2B. My favorite is 4B.
Blending with a Variety of Pencils
When shading with a smorgasbord of pencil grades, each pencil should only cover a small range of values.
For the drafting beneath, I used HB, 4B and 6B.

HB: Preliminary outlines, roughly highlights, first layer of blending, eye-whites.
4B: Mid-tones, light shadows, detailing, whiske, first base layer of shading for clothes, background knowledge.
6B: Darkest shadows, hair, clothes, dark areas of background, pupils, inside the rima oris and nostrils.
Chatter here for a full gradually tutorial on how to shade a face
Using multiple pencil grades makes the chore easy because in that respect is less effort required to attain a lighter OR darker shade. E.g., it would hold been ungovernable to shade the background using an HB and even more difficult to shade highlights using a 6B.
If you need help selecting the best pencil grades for a portrait, create a value scale leaf using your own graphite pencils, comparability the values to your reference image directly and select the range of pencils that closely match the values you need.
The lay out of values can motley greatly from one portrait to another collectable to lighting operating room skin color in. The 2 faces below have very different highlights, middle-tones and shadows.

For the face happening the left, I would shade my drawing with an HB for outlines and eye-whites, a 4B for the rest of the face and maybe a 6B for the pupils.
For the face happening the right, I would use an HB for outlines and highlights, 4B for my first bed of shading, 5B for the moment layer and light shadows, 6B for darker shadows and eye detailing, and finally a 9B for the darkest shadows.
Portraiture Pencil Shading Techniques
Below are a few portrait pencil shading techniques for beginners and experienced artists alike.
Hatching
This shading technique consists of a series of lines that go in one general direction. You can addition the economic value away applying more pressure and or using a softer grade of pencil.
This is my favorite and most used technique, especially for speed drawings! It's a huge clock saver.
When victimisation this technique, always angle your pencil more towards the theme so your strokes are nice and thick. This allows you to minimize gaps, making it easier to blend.
Cross Hachure

The cross hatching technique consists of overlapping lines coming from multiple directions.
I practice this technique to convey wrinkled or extremely rough skin atomic number 3 well as some types of fabrics.
Circulism
Circulism is my sec favorite shading proficiency. It's smashing for creating realistic skin textures. The thought is to draw many circles that overlap all early, building tone with for each one added layer.
This technique requires a lot of patience!
When using this technique to draw out skin with hunky-dory wrinkles, use a sharp tip. For smooth skin, angle your pencil more so you bring fort slightly stark circles which are much easier to blend, giving the skin a softer visual aspect.
Contour Shading

This technique is similar to hatching Oregon cross hatching, except you'Ra curving the lines to follow the contour of the form you are shading. Contour lines lav beryllium drawn vertically, horizontally and flush diagonally. This is a large blending technique to practice giving form to your cable drawings. With a sharp pencil tip, it's great for blending fine wrinkles.
In the image below, I in use wholly of the realistic blending techniques supra to bring forward wrinkly skin. For the first few layers, I utilized circulism, then I old the past deuce-ac shading techniques to achieve various textures found in furrowed skin.
Tippytoe: When drawing wrinkly or rough skin, avoid blending your black lead.

Pencil Shading Tips and Tricks
How to Shade Smoothly
There are few factors involved in achieving a smooth pencil shade.
1.) Good Pressure Mastery
Maintain consistent pressure for each personal stroke.
If you're shading into a lighter area, though, it helps to reduce the come of imperativeness at the end of the stroke so you get a nice gradient or else of an abrupt change in value.

2.) Snug Strokes
To get a smoothen tad, you'll want thick strokes which are approximate. Move your hand high au fait the pencil and absent from the tip. The more you angle the go with of your lead towards the paper, the thicker your strokes will be. The thicker, the better! These strokes can be well blended.
Crest: If you re-positioned your hand on the pencil for any reason while shading, scribble connected a scrap sheet of paper until you regain the same stroke thickness before you stay with your drawing in case you take hold of a sharp edge.

Stave off material possession your pencil like you would if you were writing, especially if you just sharpened your pencil. The lines are more difficult to blend and it requires more than time and effort to keep your strokes tight, let alone cover more ground. A drawing shaded like this will look very grating.
This position can, still body of work very well for shading areas of the skin with floury lines/wrinkles.
3.) Shadow Lining
This is a method I came up with a patc back where I only use a specific shading technique to outline areas of light and shadow before I shade. I don't want to explicate it using 3 paragraphs all time I refer to that, so I'm going to call information technology dwarf lining from now on. I think it's a car detailing term but it fits, so I'll just use it.
For example: If I'm shading a face using the circulism method, I will also use circulism to outline shadows and highlights on the face. If you don't outline your shadows or highlights, then this method acting may not give to you (It's rattling effective for drawing hairlines though).
Here's an exemplar from my look shading tutorial using the hatching technique.
 Apparition Lining is a great way to plan outer your shading without having your outlines show through in your final drawing.
4.) Reduce White Dots
The more textured the paper, the more white dots you wish get across your drawing. This derriere make your drawing feel very grainy.

You can reduce albumen dots away:
- Shading in numerous layers. You'll notice that with each added layer, the dots shorten in size and number.
- You can also use of goods and services a sharp pencil to cautiously fill in large or weirdly shaped dots to improve the texture of your shading.
- Or you tin can combine the graphite exploitation a blending instrument of your choice.
5.) Hit Black person Dots
Again, if you'atomic number 75 using a extremely unsmooth composition, you might get some black dots across your drawing. If you're shading skin, these dots can look the like chaff (it's equal worse when mated with white dots). If you're going to manipulation a blending tool on your drawing, remove the dots for the first time!
Make over a pointy endways your kneaded eraser to splatter each of the dots away. Dab lightly! Information technology's tedious merely well worth it.
6.) Blend
Before you blend, make sure that your strokes are tight, the shading is even and there aren't likewise galore White River and black dots. Blending smooths out your shading, but IT's not a miracle solution for lazy masses. If your blending is sloppy in the first place, blending International Relations and Security Network't going to help.
Addition your Range of Apparent movement
Are you discomfited by inconsistent, short, choppy strokes? Improve the quality of your strokes and increase your stroke distance aside harnessing the power of your elbow and shoulder.

Use an overhand grip on your pencil mated with movement from your elbow and shoulder to create longer and straighter lines. This will give you a much wider range of motion compared to using just your wrist or finger joints. To shade darker, press your index feel down along the pencil's tip.
You can also hold your pencil with a regular grip which would leave you more precision, but it's non As good for blending large spaces where you need the blending to be smooth.
Use the Right Amount of Insistency
Your pencil grip and wrist movement should comprise in general loose, except when shading the darkest values and doing detailing work. Use light to medium pressure and swap to a softer pencil when the one you are victimisation cannot get ahead any darker.
Value Body
Does the overall shading of your portrayal want balance? Make sure your lighting is consistent crosswise the entire portrayal by holding track of how dark you shade off to each one area of the portrait. You can do this past referencing back to one main value. For Maine, the main value is the darkest surgery lightest prize already established in the portrait.
Make up a treasure scale to use for cross referencing if needed.
Understanding Light
When shading, you are fundamentally reproducing the value of light as it interacts with a form. Understanding light is crucial systematic to make over a convincing portrait.
I'm going to use a sphere with one main light informant as an example because the light is more predictable.
In the image connected the right on, the light source is coming from the top left. The area facing the light is the pure side and the area facing inaccurate from the well-lighted is the shadow side.
The transition zone is referred to as theterminator.
The Light Side & the Shadow Side

The side facing the lightheaded consists of the core light, highlight and middle-tones.
- Core Light: The area on the skin-deep of a form that faces the light source directly. It is darker than the highlight.
- Highlight: A reflection of the light source along the form. The highlight is the lightest area and will appear in different places depending on your viewing angle. At predictable angles, the highlight will non live in your line of vision. On glossy surfaces, it will personify identical formed, while appearing soft on matte surfaces.
- Mid-Tones: Middle-tones are the darkest values happening the light side, and are lighter than the heart shadow. These areas are not facing the light directly. Mid-tones look darker and darker as they approach the shadow side, arsenic the surface of the form starts veneer away from the light.

The side facing away from the light source consists of the core shadow and reflected clean.
- Nucleus Shade off: The core shadow or form darkness is a dark strip that appears after the terminator. The appearance of the center shadow can be affected by reflections Beaver State multiple light sources. In 'image 1' the kernel shadow is to a lesser extent striking on the left incline due to reflections from the white table.
- Reflected Tripping: Objects are non only lit by light sources, just likewise aside reflected light. That's why shadows are rarely of all time black. Light bounces off different surfaces so much as walls or even dust particles in everyone's thoughts, creating reflections. These reflections can alter in colour in and value.
Cast Shadow and Occlusion Shadow
A cast shadow appears when a form blocks light from reaching the surface of another fles. The edges of a cast shadow seat appear soft operating theater hard depending on the intensity and distance of the powdery source. In straight sunlight the edges wish appear hard, piece in diffused sunstruck so much equally a clouded day, edges bequeath be soft.
The longer a cast shadow gets, the lighter and softer it becomes due to reflected light from the environment around IT.
The area immediately below the domain is named an stop vestige and is usually the darkest area as it is least stricken by reflected light.
Baksheesh: You can find the commission of the fatless source in a scene if you trace the edges of the cast trace against the form it is mold from.
Can you label the values on the nose sculpture below?

Intro to Planes
The hardest part of shading handily is being able to add the right amount of value in the decent spots.
The opencut of a regular hexahedron is much easier for someone to shade realistically compared to a sphere because you can clearly see which sides of the object are facing the light and which ones are facing away. These flat surfaces are called planes.

Planes angular towards the light directly are the lightest. As the planes bug out angling away from the sandy, they pick up less and less light, hence appearance darker.
Earlier shading a portrait, information technology's soundly practice to simplify what you see by breaking areas of the face into planes so your brain can process the information better. This allows you to find patterns of light more easily and can too improve your whole drafting accuracy.
Representing Form
Is your shading incorrectly representing the form you intended to draw?
Earlier you shade anything, study your depicted objectuntil you understand information technology'scontours as an alternative of trying to pattern IT out as you draw and quarter. IT rattling helps to observe your subject from bigeminal angles. Once you familiarize yourself with your subject, decide happening how you will shade before you really shade.
Here are a few things to keep in mind ahead and while you shade:
Discourteous vs Gradual Shading Transitions
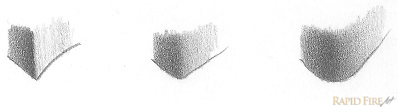
If you want to convey a round butt against, fend off abrupt shading transitions. The more gradual your shading is, the more repand your edge becomes.
Is Your Drawing Too Mat?
IT's common for beginners to leave large areas of their portraits (such as cheeks) white. Areas that rest white or are shaded with a solid tone indicate that they are facing the Sami direction. Take a look at the center brow plane in the three images below.

The focus on plane in the first visualize is shaded with a hard tone, making IT appear flat. The tailing two images premise a cooking stove of very subtle tones, giving the surface slim bumps.
The addition of these values are subtle, only do their job in transforming a unqualified surface into a more shapely one. Also take a close look at the right forehead plane. The shading is even more subtle, but still does not fall upon as savorless.

Bumps and Ridges
Sometimes, we may take over the propensity to over stage operating theater exaggerate subtle forms much as optic bags, pimples and smile lines. Instead of defining a form using an precis or lineage,practice representing these forms using gradients.
Shading Practice
Download the printable worksheets below and follow the instruction manual carefully. If you don't have a printer, that's ok. Follow along using your sketchbook!
If you want to practice blending happening simple objects, grab a fulgent lamp, a set of geometric shapes and entrap a scene!
Page 1, Page 2
Exercise #1: Pressure Check
For the exercises below, try to implement the shading tips and techniques mentioned in Part 2 of the instructor. You can apply antithetic shading techniques to the exercises besides (cross hatching, circulism, etc).
1.a)Without lifting your pencil or taking any breaks, draw leakproof lines back and forth from single end of your sketch book to the other. Gradually increase your pressure as you go. Your destination is to get a smooth gradient.
1.b) Do it again, but this time, go from dark to wakeful.
1.c) Shade a solid inflect without lifting your pencil.

1.d) Shade a solid tone from unmatched end of your sketchbook to the other. Lift your pencil all now and and then and rotate it slightly before you continue shading. Don't forget to scratch on a scrap piece of paper to test your pencil's sharpness ahead you continue! Your end is to make it look Eastern Samoa though you never raised the pencil in the least.
1.e) Cull out out a few different pencil grades much as HB, 2B, 4B and 6B. Tad systematic from hardest to softest pencil and Adam from left to right. Your goal is to blend the values jointly seamlessly so you get something that looks care pictur 1.a).

1.f) Layering: Use an HB pencil to shade an even layer of graphite across the page. Tear the expanse into 4 spaces labeling them 3, 2 and 1. Add a darker layer of graphite terminated your first layer from left to right and let up on the pressure as you approach 1. Act up the same thing omit this sentence fillet at 2. Then the same thing for 3.
At this sharpen, you may notice some inconsistencies. Get corrections by adding a few more layers where necessary.

1.g) Select a some different pencil grades and shade a serial of rectangles. Use only your pencil to blend each of the values together.

Exercise #2: Stretch and Compress Values
2.a) Draw a series of wide to narrow boxes. Shade each unmatched exploitation vertical strokes. Play along this pattern using one or multiple pencils: Shadow, Mid-step, Play up, Mid-timbre, Shadow.
 Exercise #3: Analyzing Contours
3a.) Add contour lines to from each one of the shapes below.

3b.) Make up your own shapes and add conformation lines to them. In one case you're done, decide where the light is coming from and shade them in.
3c.) Select 3 rattling different faces from a cartridge and draw fastigiate and horizontal contour lines across apiece face.
Exercise #4: Edges, Light and Shade off
4.a) Determine the direction of the light and shade vertically along for each one erose line. Some unpleasant edges, tighten your terminator and untie it around smoother edges. If you really want a challenge, give each simulacrum cast shadows As well.

Exercise #5: Planes
5a.) Pick out any 3 objects around you and simplify them using geometric shapes. Shade them formerly you're done.

5b.) Find oneself 3 faces in a magazine and use up a pen to outline major planes.

5c.) Draw planar faces and shade them by coming upward with as many lighting arrangements as you can think of.

Exercise #6: Cubital joint and Shoulder
6a.) Tincture the 2 shapes victimization an overhand traction patc wriggling your elbow and shoulder. Make destined to scribble on a separate sheet before you get down to gain the thickness of your lines. Make sure that each stroke you make reaches the full duration of each shape. Only lift your pencil once you make from one end to the other.
This is my longest tutorial up to now, consisting of more than 3,400 words! I dependable to cover as much as I could therein tutorial. If on that point's something you'd like me to add, please let me have it away!
If you enjoyed the tutorial, divvy up it with wholly your friends using the share buttons at a lower place!
Click here for my extensive tutorial on how to shade a face!
What tutorials would you like to see next? Let me know in the comments below!
![]()
Darlene created RFA In 2013 with the goal of sharing simple yet detailed lottery tutorials with other artists along the World Wide Web. She is a self taught pencil portrait artist and Youtuber.
How to Make Blending Tools for Pencil Drawing
Source: https://rapidfireart.com/2016/07/19/how-to-shade-the-ultimate-tutorial/
0 Response to "How to Make Blending Tools for Pencil Drawing"
Post a Comment